Reading a Garden Site in Five Observations
Reading a garden site before buying plants helps you match choices to sun, slope, wind, drainage, and existing growth instead of fighting the yard.
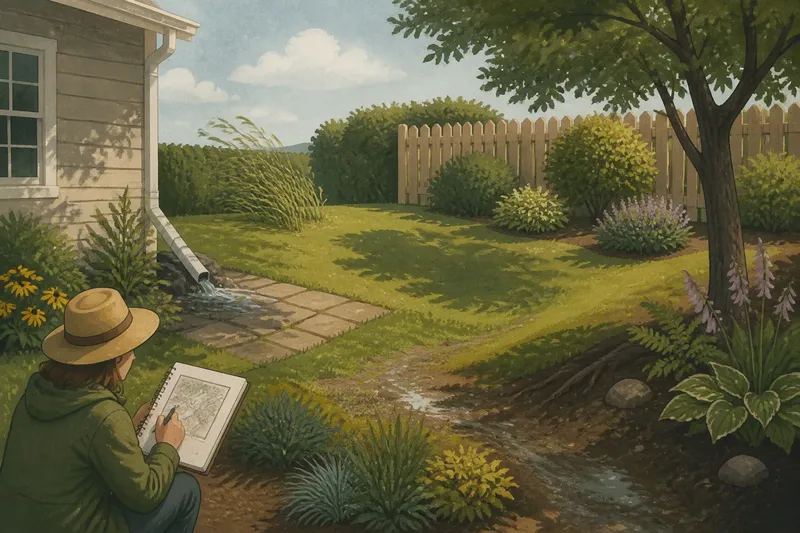
The common mistake in reading a garden site is choosing plants after one sunny-afternoon glance and treating the whole yard as uniform. That can cost a season of effort: a windy corner, a shaded strip, or a spot where water lingers may frustrate a planting for reasons that are difficult to diagnose later. Before shopping, record five observations for each area you plan to plant.
This is not a soil test or a promise that every plant will thrive. It is a practical portrait of the conditions your yard offers. Use a phone notes app, graph paper, or a printed property sketch to divide the site into useful areas rather than giving the entire garden one label.
Map the specific area you plan to plant
Choose one bed or patch and mark its outline on a rough map. Note nearby features such as a house wall, fence, large tree, driveway, downspout, or open edge. These can change sunlight, airflow, and where water travels.
Walk the area more than once and at different times of day. Include a visit after a change in weather. “Bright before lunch, shade by midafternoon” is more useful than a broad label such as “part sun.” Record what you observe, not what you hope to grow.
Track sunlight before choosing plants
Note where direct sun reaches the ground and where shade falls. The pattern can shift with the season, nearby trees, and the sun’s angle, so describe what you observed rather than assigning a permanent category too quickly. A photo taken from the same spot can help you compare conditions on another visit.
If most of the patch receives direct light and has little protection, consider plants suited to open, bright conditions. If a building or tree shades it for much of the day, look for plants that tolerate shade. For a moving band of sun and shade, check each candidate’s label and reliable local guidance before buying.
Trace the slope to understand water movement
Stand back and look across the ground. Does it fall away from a wall, dip into a low pocket, or run toward a path? A slope can move water downhill, while a hollow may collect it. Note exposed roots or places where soil appears to have shifted; these are areas worth watching.
If the ground slopes away and looks exposed, choose plants suited to the conditions you observe rather than assuming nearby level ground behaves the same way. If the area sits low, watch it after rain before choosing plants. Changing a slope or directing water can affect property or safety, so seek qualified help when the work goes beyond ordinary planting.
Record wind exposure independently
Wind leaves no clear boundary on a map, so note whether a hedge, fence, or building shelters the area or whether gusts cross an open yard. On breezy days, observe nearby grasses, shrubs, and hanging leaves. Record whether the planting spot itself feels exposed.
For an open, windy patch, consider plants suited to exposed conditions and avoid putting delicate, tall growth where it will be repeatedly buffeted. A sheltered corner may suit plants less tolerant of drying wind, provided the light and drainage also fit. A fence’s effect varies with its height and gaps, so observe conditions at the planting spot rather than assuming every fenced area is protected.
Check the surface after rain
After rainfall, look for puddles, water moving across the ground, and areas that stay visibly damp after nearby ground has cleared. Note where a downspout releases water or paving sends runoff. These observations describe surface drainage, not every condition below ground.
If water lingers in one patch, mark it and compare it with the surrounding ground instead of treating the whole bed as equally wet. If the surface clears quickly and no water collects, that points to different conditions, but it does not establish how the soil behaves deeper down. Check local rules before making changes that redirect runoff.
Use existing plants as clues
List plants already growing in or beside the area, including volunteer seedlings, lawn, weeds, shrubs, and trees. Note where each grows well or appears thin. Existing vegetation can reveal differences within a bed, but it cannot diagnose the site by itself: plants may have been watered, pruned, or planted under conditions that have since changed.
Notice whether a large tree’s canopy shades the ground or its roots occupy the planting area. If healthy growth clusters in one part of the patch, compare that location’s light, slope, and exposure with the rest before copying it elsewhere. Treat existing growth as a reason to look more closely, not as a rule to follow.
How should you sort a bed with mixed conditions?
What should you do when one bed has sun and shade?
Draw a boundary between the sections and record each light pattern separately. Match plants to their specific planting spots rather than choosing one list for the entire bed.
How should you assess a sloped, windy patch?
Record where the ground falls and where wind reaches it, then consider both conditions together. Check that a plant suited to exposure also fits the spot’s light and moisture conditions.
What if a low patch stays damp after rain?
Mark its edge and observe it again after another rainy spell instead of treating nearby ground as equally wet. A plant suited to damp ground may fit the low patch, while the higher edge may need a different match.
How can existing plants guide a new choice?
Record where they grow and compare those locations with shade, slope, and runoff. Treat their condition as a clue to investigate, not proof that a new plant will thrive in the same place.
Turn the five observations into a planting decision
Describe each distinct planting area in plain language, such as “morning sun, shade later, slight downhill fall, open to wind, no surface water seen after rain.” Compare that description with a plant’s needs. The following checks link an observation to a next decision:
- Sun: If the area receives direct sun for much of the observation period, compare candidates with open, bright conditions; if a building or tree shades it, look for shade-tolerant choices.
- Mixed light: If sun and shade fall on separate parts of the bed, mark the boundary and choose for each zone; if the pattern shifts across the whole area, check plant labels and local guidance before committing.
- Slope: If the ground falls toward a path or wall, note where water travels and choose for that condition; if soil appears to shift or the change would redirect runoff, pause and seek qualified help.
- Wind: If grasses or leaves move strongly in an exposed spot, favor plants suited to open conditions; if a fence seems to shelter the area, check wind at ground level before relying on it.
- Surface water: If puddles or lingering damp mark a low patch, keep it separate on the map and consider plants suited to the observed moisture; if water appears to threaten a structure or neighboring property, get qualified advice before altering drainage.
- Existing growth: If healthy plants cluster in one part of the bed, compare its light, slope, and exposure with the rest; if those conditions differ, do not copy the same plant choice across the entire area.
- Plant fit: If a candidate’s stated light and moisture preferences match your notes, check whether its mature form suits the available space; if the notes conflict with its needs, choose another candidate or gather more observations.
Imagine you are planning a narrow strip beside a west-facing wall. Your starting notes, treated as invented conditions, are strong afternoon sun, paving that sheds water toward one end, little wind protection, and established plants only near the shaded entrance. First, draw the strip and mark the entrance, wall, and runoff direction. Next, divide the bright open section from the shaded entrance and label the low end where water travels. Then compare candidate plant labels with each zone’s light and moisture notes, and reject any choice whose needs conflict with its assigned spot. The resulting plan uses separate choices for the open strip and sheltered entrance; the tradeoff is that the bed may look less uniform, but the choices reflect the different conditions you recorded.
Before purchasing, compare each candidate’s stated light and moisture preferences with your notes, then check whether its mature form fits the available space. Keep the map and add observations as seasons change. When a planting struggles, reading a garden site through those recorded conditions gives you a concrete starting point for deciding whether the mismatch is light, slope, wind, surface water, or a difference within the bed.